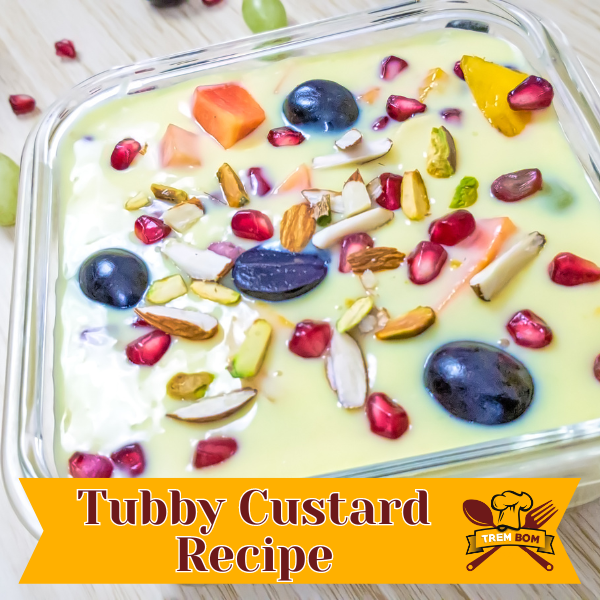
Did you know that over 60% of us have a soft spot for nostalgic chocolate desserts with familiar flavors from our childhood? That’s why we’re diving straight into the whimsical world of Teletubbies with our own spin on tubby custard, serving it as a dessert in a large bowl with various flavors for children!
No need to daydream about those pink, gooey delights—our homemade tubby custard dessert recipe is all about bringing those magical TV moments and flavors to your kitchen, with a cup of heavy cream. Together, we’ll whip up a dessert recipe in a bowl that’s not just fun to look at but also scrumptious with its flavors to taste. So let’s grab our aprons and get ready to whisk together a dessert recipe with cornstarch for some culinary time travel!
Whether it’s for a themed party or just an afternoon snack, this tubby custard recipe with cornstarch promises loads of giggles and satisfied sweet tooths. And hey, who says you can’t relive the good old days through an old recipe?
Key Takeaways
- To make authentic tubby custard, closely follow the ingredients breakdown to ensure you have all the necessary components.
- Use the step-by-step instructions as a guide to achieve the perfect consistency and avoid common mistakes in preparation.
- Achieving the right texture is crucial for authentic tubby custard; refer back to the “Perfecting the Texture” section for tips on how to get it just right.
- Keep the nutritional profile in mind to understand the health implications of tubby custard and make informed decisions about portion sizes.
- For best results, adhere to the storing and reheating guidelines to maintain the quality and flavor of your tubby custard over time.
- Experiment with flavor variations and serving suggestions to keep the experience exciting and tailor it to personal tastes or dietary requirements.
Ingredients Breakdown
Essential Components
When we embark on the journey to make tubby custard, the recipe, quality, and authenticity are our guides. We’ve learned that certain ingredients are non-negotiable. For instance, whole milk is a cornerstone of the tubby custard recipe; it provides the creaminess that defines the dessert’s texture.
In our quest for perfection in a recipe, we can’t overlook the importance of ingredient quality. Freshness matters. Whether it’s eggs or vanilla extract, each component of the recipe must be top-notch to ensure a delightful outcome.
- Core items include:
- Whole milk
- Eggs
- Vanilla extract
These ingredients lay the foundation for an authentic tubby custard experience and cannot be substituted if we’re aiming for that classic taste we all cherish.
Flavor Enhancers
Now let’s talk about taking flavor up a notch. Spices like cinnamon can add a subtle warmth to our tubby custard recipe without overpowering its inherent sweetness.
Natural sweeteners offer variety too. Honey or maple syrup could replace traditional sugar, lending unique undertones to the dish’s flavor profile.
Dairy enhancers like heavy cream deepen richness while dairy-free alternatives such as coconut milk cater to different dietary needs without compromising on taste.
- To elevate taste consider:
- Cinnamon or nutmeg for warmth
- Honey or maple syrup for natural sweetness
- Heavy cream or coconut milk for richness
We find joy in experimenting with these additions; they allow us to personalize each batch of tubby custard.
Step-by-Step Instructions
Mixing Techniques
Now that we’ve got our ingredients lined up, let’s dive into the mixing techniques. To get that perfect tubby custard fluffiness, we need to fold gently. This means combining our ingredients in a way that incorporates air and doesn’t deflate the mixture.
First, we’ll grab a spatula and delicately mix our base. Imagine you’re giving it a soft hug with each fold. The goal is to keep it light and airy. Next comes whisking—here’s where texture takes shape. We’ll use a whisk to beat some parts until they’re just right; not too firm, not too soft.
Remember, the temperature of your ingredients can make or break your custard. If everything’s at room temperature, you’ll find they blend together like best friends at a party!
Cooking Process
Moving on to cooking: this is where things heat up! Finding the optimal heat setting is key for creamy consistency without burning our creation.
We set our stove low and start slow—it’s like coaxing the flavors out rather than rushing them. Patience here means no lumps or burns in sight! And timing? It’s as crucial as adding salt to pasta water—miss it and you miss perfection.
As for adding ingredients, think of it as choreography—each step follows another in sequence for harmony in taste and texture.
Perfecting the Texture
Consistency Tips
After following our step-by-step instructions, we’re now ready to focus on the texture of our tubby custard. Achieving the perfect thickness is crucial for that authentic feel. If it’s too runny, add a bit of flour while cooking; this helps thicken it up. For a creamier set, we prefer using heavy cream instead of milk.
We’ve found some handy tools to test custard readiness. A wooden spoon works well—dip it in and draw a line with your finger across the back. If the line stays clear without custard running down, you’ve nailed it!
To adjust for a firmer set, cook the mixture longer on low heat but keep an eye out! Overcooking leads to separation and lumpiness.
Nutritional Profile
Health Benefits
After mastering the texture of Tubby Custard, let’s dive into its nutritional highlights. We’re all about treats that are tasty and good for us too. By choosing low-fat milk or plant-based alternatives, we can cut down on unwanted calories without sacrificing creaminess. Instead of regular sugar, opting for natural sweeteners like honey or maple syrup gives a hint of sweetness while keeping things healthier.
Incorporating fruit into our Tubby Custard not only adds a burst of flavor but also infuses it with vitamins and antioxidants. Imagine blending strawberries for a pop of color and a dose of vitamin C. Or mixing in blueberries for their brain-boosting properties.
- Low-fat milk or almond milk reduces fat content.
- Sweetening with honey instead of sugar lowers added sugars.
- Adding fruits like strawberries increases vitamin intake.
These swaps make our treat both delightful and nourishing — truly the best of both worlds!
Transforming traditional recipes to suit health-conscious eaters is simple yet impactful. It means we can enjoy our favorite desserts while nurturing our bodies—a win-win situation if you ask us!
Dietary Considerations
We believe everyone should be able to indulge in delicious Tubby Custard, no matter their dietary needs! That’s why we’ve explored gluten-free flours like oat flour or almond flour as bases—perfect for friends who avoid wheat.
Common allergens often lurk in desserts, but they don’t have to spoil the party. Swapping out cow’s milk for coconut or soy milk makes this dessert vegan-friendly too! And using seed butter over nut varieties caters to those with nut allergies.
- Choose gluten-free flours such as oat flour.
- Use non-dairy milks like coconut milk.
- Select seed butter instead of nut butter.
Adapting recipes isn’t just thoughtful; it’s essential for inclusivity at the table (or picnic blanket!). Whether someone is vegan, allergic to nuts, or steering clear from gluten—we’ve got them covered!
Storing and Reheating
Refrigeration Methods
After we’ve enjoyed the fun of making our tubby custard, it’s important to store it properly. We make sure to cool the custard first. Rushing it into the fridge while hot can mess with its texture. Cooling should be gradual.
Once cooled, we use plastic wrap to cover the surface. This stops a skin from forming on top. It’s like putting a blanket over our creation, keeping it just right. The ideal chill time is about two hours before serving.
Warm-up Tips
When we’re ready for seconds, reheating must be gentle to keep that creamy dreaminess intact. We avoid microwaving if possible; uneven heating can create those dreaded hot spots.
Stirring constantly over low heat is how we do it on the stove-top—no scorched bottoms here! And remember, patience is key when bringing back that silky-smooth warmth.
Flavor Variations
Strawberry Delight
We’ve found that adding fresh strawberries to our tubby custard recipe brings a delightful fruity twist. The sweet and tart flavors mingle perfectly, creating a taste that’s both refreshing and indulgent.
By blending the berries into the mix, we strike a balance between tartness and sweetness. It’s important not to overpower the original flavor but rather enhance it with this natural fruit addition. And for an eye-catching finish, we love using strawberry slices as garnishes. They add color and make each serving look extra special.
Alternative Ingredients
Sometimes, we need to tweak our tubby custard recipe due to ingredient availability or personal preference. We’ve discovered some fantastic substitutes for core components that keep the essence of this beloved treat intact.
For those who prefer or require non-dairy options, substituting regular milk with almond or oat milk works wonders. Similarly, coconut cream can replace traditional cream without losing the creamy texture we all enjoy in tubby custard.
Incorporating these alternatives doesn’t just cater to different needs; it also introduces new layers of flavor. For instance, vanilla extract can be used sparingly to complement these substitutions and ensure every spoonful is as delicious as ever.
Serving Suggestions
Complementary Pairings
After exploring the delightful flavor variations of Tubby Custard, finding the perfect partners to complement its taste is key. We love pairing our custard with a side of crunchy biscuits or a dollop of fruit compote. The contrast between the smooth custard and the crispiness of biscuits creates a symphony in your mouth.
For those who enjoy sipping on something while indulging, we’ve found that certain drinks truly enhance the Tubby Custard experience. A glass of cold milk or a cup of warm tea can be just right. AndTubby Custard always fits perfectly.
- Ideal pairings for Tubby Custard:
- Crunchy biscuits.
- Fruit compote.
- Cold milk.
- Warm tea.
Presentation Ideas
We believe that eating with your eyes first makes every dish more enjoyable – and this holds true for serving Tubby Custard too! Using transparent dishes not only showcases those lovely layers or swirls but also adds an element of excitement, especially for kids who are eager to dive into their sweet treat.
To make things even more appealing, we sprinkle some garnish over our custardy creation before presenting it. A few berries or mint leaves can add both visual appeal and bursts flavor. For us, creative plating is all about impressing guests and bringing joy to meal times – whether by using fun shapes or arranging everything neatly on a large bowl with colorful spoons around it.
- Garnishing tips:
- Fresh berries.
- Mint leaves.
Preservation Outside Fridge
Safe Storage Tips
After enjoying tubby custard, we need to store it properly. Proper containers are key. We use airtight containers to keep our tubby custard fresh. This prevents air from getting in and causing spoilage.
We also pay attention to temperature. It’s crucial for preventing bacteria. Tubby custard should be kept cool, ideally below 40°F (4°C). But not every adventure allows us fridge access! When that happens, we pack the custard in insulated bags with ice packs.
Labeling is another smart move we make. We write down when we made the tubby custard on the container. This helps us track its shelf life and ensure safety.
- Use airtight containers.
- Keep under 40°F (4°C).
- Label with the date made.
Shelf Life
Knowing how long our treats last is important too. In a fridge, homemade tubby custard can stay good for up to five days if stored correctly.
But sometimes things go wrong, and our treat might spoil faster than expected. If it smells off or changes color, those are clear signs of spoilage — and that means it’s time to discard it without tasting.
And what about freezing? Freezing can extend shelf life significantly! While there might be slight texture changes once thawed, frozen tubby custard remains delicious for several months!
By keeping these tips in mind:
- Store in an airtight container.
- Check regularly for signs of spoilage.
- Freeze for longer preservation.
Conclusion
Summary
We’ve whipped up all the secrets to making that dreamy tubby custard you’ve been craving. From the rich ingredients to the nitty-gritty of getting that silky-smooth texture, we’ve covered it all. We’ve even dished out savvy tips for storing leftovers and jazzing up your custard with flavor twists. And hey, don’t sweat it if there’s no fridge space; we’ve got you sorted with preservation hacks.
So what’s the hold-up? Grab your spoon and dive into a bowl of homemade delight. Share your tubby triumphs or epic fails with us—let’s laugh and learn together. Ready for another culinary caper? Stick with us for more foodie adventures that’ll keep your taste buds on their toes!
Frequently Asked Questions
What ingredients do I need for tubby custard?
You’ll just need a few basic items. Check out the “Ingredients Breakdown” section to get your list together—it’s short and sweet!
Can you walk me through making tubby custard?
Absolutely! Pop over to the “Step-by-Step Instructions” for a foolproof guide that’ll have you whipping up custard in no time.
How do I get that perfect tubby custard texture?
Nail the creamy dreaminess by following tips in “Perfecting the Texture.” It’s all about balancing thickness and smoothness.
Is tubby custard nutritious?
Yes, it can be! Peek at our “Nutritional Profile” heading to see how it fits into your diet—spoiler: it’s more than just tasty!
What’s the best way to store and reheat leftovers?
Stash them safely with guidance from “Storing and Reheating.” We’ve got tricks to keep that custardy goodness fresh.
Are there different flavors of tubby custard I can try?
For sure! Dive into “Flavor Variations” for some fun twists on the classic recipe. Your taste buds will thank you.
Any serving suggestions for my homemade tubby custard?
Check out “Serving Suggestions” for creative ways to dish up this treat. From casual snacks to fancy desserts, we’ve got ideas aplenty.