Frying has long been a beloved cooking technique, producing mouthwatering dishes that captivate our taste buds. Whether it’s perfectly golden French fries or crispy chicken wings, frying offers a world of culinary possibilities. In this comprehensive guide, we will explore the art of frying, from understanding the basics to achieving exceptional results. Get ready to embark on a flavorful journey as we uncover the secrets to creating perfectly fried delicacies right in your own kitchen.
Introduction
When it comes to achieving the ideal balance between a crunchy exterior and a moist interior, frying takes center stage. This cooking method involves submerging food in hot oil, resulting in a delectable texture and enhanced flavors. While frying may seem straightforward, mastering the technique requires an understanding of key factors such as temperature control, coating options, and the proper use of cooking oil. With the right knowledge and techniques, you can create fried dishes that rival those of professional chefs.
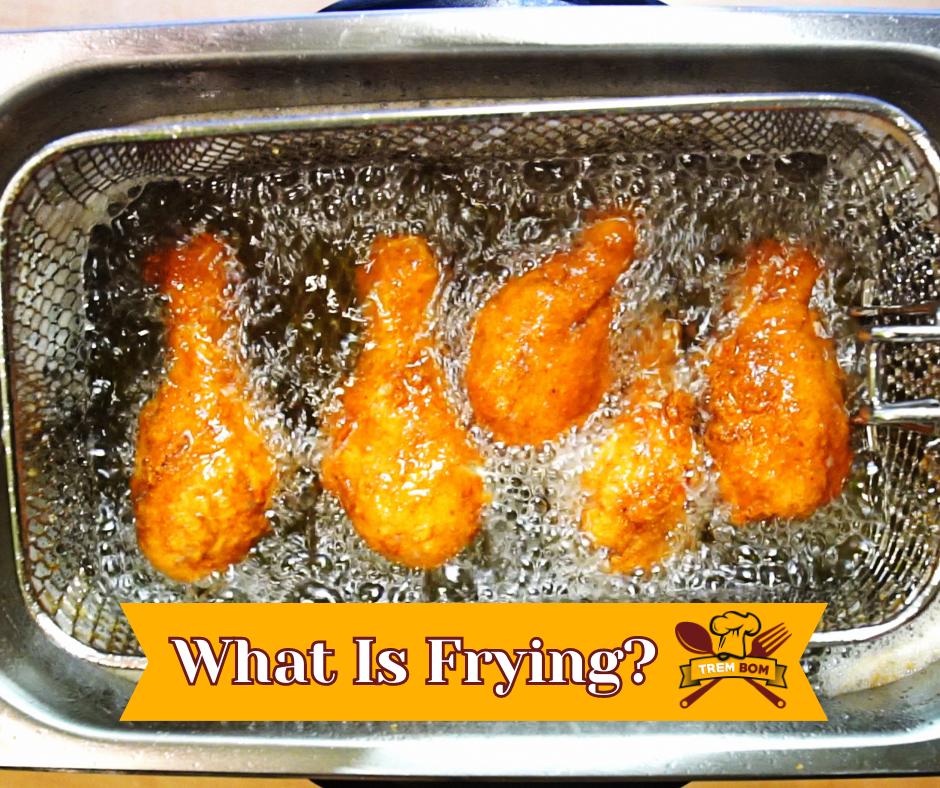
Understanding the Basics of Frying: What is Frying?
At its core, frying involves cooking food in hot oil or fat. The high heat causes a series of chemical reactions that transform the texture and flavor of the ingredients. When done correctly, frying creates a delectable crispiness while sealing in the natural juices of the food, much like searing, but this method cooks the entire object instead of one side at a time. The result? An irresistible blend of taste, texture, and aroma.
Different Types of Frying Techniques
Frying techniques can vary depending on the desired outcome and the food being prepared. The most common types of frying include shallow frying, deep frying, and stir-frying.
Shallow frying involves partially submerging the food in oil, typically in a skillet or frying pan. This technique is perfect for foods that require a delicate and even browning, such as breaded cutlets or fish fillets.
Deep frying, on the other hand, entails fully submerging the food in a large amount of hot oil. This method creates a deep, golden-brown exterior while ensuring the food is evenly cooked. Deep frying is often used for dishes like french fries, onion rings, or crispy fried chicken.
Stir-frying, a staple of Asian cuisine, involves quickly frying small pieces of food in a wok or skillet over high heat. This method allows for rapid cooking while preserving the natural flavors and crispness of the ingredients.
Importance of Temperature Control
One of the critical aspects of successful frying is maintaining the proper oil temperature. Too low, and your food will absorb excess oil, resulting in a greasy texture. Too high, and the exterior may burn before the interior is fully cooked. To achieve the perfect balance, it’s essential to use a thermometer and closely monitor the oil’s temperature throughout the frying process.
Choosing the Right Cooking Oil
The type of cooking oil you use significantly impacts the flavor, texture, and overall success of your fried dishes. Different oils have varying smoke points, which is the temperature at which they start to break down and produce smoke. It’s crucial to select an oil with a high smoke point to avoid unpleasant flavors and smoke.
Common oils suitable for frying include canola, vegetable, peanut, and sunflower oil. Each has its distinct characteristics and flavors, allowing you to customize your dishes according to your preferences.
Essential Tools for Frying
Before diving into the frying process, it’s essential to have the right tools on hand. Here are a few must-haves for successful frying:
- Deep Fryer or Heavy-Duty Pot: Investing in a deep fryer or a sturdy pot with high sides allows for precise temperature control and minimizes the risk of oil splattering.
- Thermometer: A reliable kitchen thermometer is crucial for accurate temperature measurement and maintaining consistency throughout the frying process.
- Tongs or Slotted Spoon: These tools come in handy for safely adding and removing food from the hot oil, minimizing the risk of burns.
- Paper Towels: Keeping a stack of paper towels nearby allows you to drain excess oil from fried foods, ensuring a crispy texture.
Preparing for Good Frying: Cut Food First and Fry in Batches
Preparing the Food
Properly preparing the food you intend to fry is essential for achieving optimal results. Start by ensuring the ingredients are dry, as excess moisture can cause the oil to splatter. Use paper towels to pat dry the food thoroughly before coating or breading it.
Additionally, cutting food into consistent sizes ensures even cooking. Smaller pieces generally fry faster and more evenly than larger ones. Keep this in mind when preparing ingredients like potatoes for french fries or chicken for nuggets.
Coating and Breading Options: Batter, Breadcrumbs, Flour
Coating and breading add an extra layer of texture and flavor to your fried creations. Here are a few popular options:
- Batter: A simple batter made from flour, eggs, and liquid creates a light and crispy coating. Experiment with different liquid options like milk, buttermilk, or even beer to achieve varying flavors and textures.
- Breadcrumbs: Coating your food in breadcrumbs, whether plain or seasoned, provides a crunchy texture and helps lock in moisture. For an extra crispy result, consider mixing breadcrumbs with crushed crackers or cornmeal.
- Flour: A classic option for breading, flour is versatile and works well with a wide range of ingredients. You can enhance the flavor by adding herbs, spices, or even a touch of baking powder to create additional crispiness.
Don’t Forget To Check The Temperature: Use a Thermometer!
Maintaining the right oil temperature throughout the frying process is crucial. If the oil is too cool, the food will absorb excess oil and become greasy. If it’s too hot, the exterior may burn while the interior remains undercooked. To prevent these issues, follow these steps:
- Heat the oil slowly and steadily to the desired temperature, usually between 350°F (175°C) and 375°F (190°C), depending on the recipe.
- Use a thermometer to monitor the oil’s temperature and adjust the heat as necessary to maintain a consistent level.
- Avoid overcrowding the fryer or pan, as adding too much food at once can significantly reduce the oil’s temperature. Fry in small batches to ensure even cooking and crispy results.
Safety Precautions
Frying involves working with hot oil, so it’s vital to take proper safety precautions to prevent accidents or injuries. Here are some essential safety tips to keep in mind:
- Choose the Right Cooking Vessel: Opt for a deep fryer with built-in safety features or use a heavy-duty pot with high sides to minimize the risk of oil splattering or spills.
- Keep a Fire Extinguisher Nearby: In case of a grease fire, having a fire extinguisher within reach is crucial. Remember, never use water to extinguish a grease fire, as it can cause the flames to spread.
- Avoid Overfilling the Pot: To prevent oil from overflowing and causing a potential fire hazard, never fill the pot more than halfway with oil.
- Never Leave Unattended: Never leave hot oil unattended, as it can quickly reach its smoke point or catch fire. Stay vigilant and focused while frying.
- Use Oven Mitts or Heat-Resistant Gloves: Protect your hands and arms by using oven mitts or heat-resistant gloves when handling hot pots, pans, or utensils.
- Keep Children and Pets Away: Make sure to create a safe zone around the frying area to prevent accidental burns or injuries. Keep children and pets at a safe distance.
How To Deep Fry At Home Step-by-Step
Now that we’ve covered the basics let’s dive into the step-by-step process of achieving perfectly fried delights. Follow these instructions to ensure outstanding results every time.
Heating the Oil
The first step in the frying process is heating the oil to the proper temperature. Here’s how to do it:
- Choose a deep fryer or a heavy-duty pot with high sides that provides ample room for the food and oil.
- Add enough oil to submerge the food fully. Typically, you’ll need about 2-3 inches of oil, but this can vary depending on the recipe and the size of the frying vessel.
- Place the fryer or pot over medium heat and begin heating the oil slowly.
- Use a thermometer to monitor the oil’s temperature. Adjust the heat as necessary to reach the desired frying temperature, usually between 350°F (175°C) and 375°F (190°C).
Adding the Food
Once the oil reaches the desired temperature, it’s time to add the food. Follow these steps for safe and efficient frying:
- Carefully lower the food into the hot oil using tongs or a slotted spoon. Be cautious to avoid dropping the food, as it can cause the oil to splatter.
- Avoid overcrowding the fryer or pan. Adding too much food at once can lower the oil’s temperature, resulting in greasy and unevenly cooked dishes.
- Fry the food in small batches to ensure even cooking and maintain the oil’s temperature.
Monitoring the Temperature
Throughout the frying process, it’s crucial to monitor the oil’s temperature to achieve the best possible results. Follow these guidelines:
- Keep an eye on the thermometer and adjust the heat as needed to maintain a consistent frying temperature.
- If the oil temperature drops significantly after adding the food, increase the heat slightly to bring it back to the desired range.
- Avoid raising the heat too high, as it can lead to excessive browning or burning of the food.
Achieving Crispy and Golden Results
The key to achieving perfectly crispy and golden fried food lies in the following techniques:
- Maintain the oil temperature within the recommended range throughout the frying process. Consistency is crucial for even cooking and optimal texture.
- Allow the food to cook undisturbed for the initial moments to ensure proper browning and avoid sticking.
- Use tongs or a slotted spoon to gently move the food around occasionally, promoting even browning and preventing sticking.
- Fry the food until it reaches the desired level of crispiness and golden color. Keep in mind that different foods will require varying cooking times.
Removing the Food from the Oil
Once the food has reached the desired level of crispiness and golden color, it’s time to remove it from the oil. Follow these steps for safe and efficient removal:
- Use tongs or a slotted spoon to carefully lift the food out of the oil, allowing any excess oil to drain back into the fryer or pot.
- Transfer the fried food to a plate lined with paper towels to absorb any remaining oil. This step helps maintain a crispy texture.
- Let the food cool slightly before serving to avoid burns. Enjoy your delicious homemade fried creation!
Proper Oil Disposal: Can You Reuse Oil or Can You Pour Oil Down the Drain?
Proper oil disposal and reuse are important considerations when it comes to frying. Here are some guidelines to help you handle cooking oil responsibly.
When to Dispose of Used Oil
Used oil should be disposed of properly to avoid environmental contamination and maintain kitchen hygiene. Here are a few indicators that it’s time to dispose of used oil:
- The oil has a rancid or off odor.
- The oil has a dark, murky appearance.
- The oil foams excessively during frying.
- The oil produces a lot of smoke during frying.
- The oil has been used for an extended period or for frying heavily seasoned foods.
Safe Oil Disposal Methods
To dispose of used cooking oil safely, consider the following options:
- Cool and Store for Reuse: If the oil is still in good condition, strain it through a fine-mesh sieve or cheesecloth to remove any food particles. Allow the oil to cool completely, then store it in a clean, airtight container for future use.
- Recycling Centers: Many recycling centers accept used cooking oil. Check with your local recycling facilities or community programs to see if they provide oil recycling services.
- Solidify and Discard: If reusing or recycling options are not available, you can solidify the oil for easy disposal. Allow the oil to cool, then mix it with an absorbent material like kitty litter or paper towels. Seal the mixture in a bag and dispose of it in the regular trash.
Reusing Cooking Oil
In some cases, you can reuse cooking oil for future frying. Follow these tips to extend the lifespan of your cooking oil:
- Strain the oil after each use to remove any food particles or debris that can contribute to oil degradation.
- Store the used oil in a clean, airtight container away from light and heat. Proper storage helps maintain the oil’s quality and prevents contamination.
- Monitor the oil’s color, odor, and appearance. If it becomes dark, develops an off odor, or shows signs of deterioration, it’s time to discard it.
- Avoid reusing oil that has been used for frying highly seasoned or heavily spiced foods, as these can leave undesirable flavors in the oil.
Tips for Extending Oil Lifespan
To maximize the lifespan of your cooking oil, consider the following tips:
- Use a clean and dry utensil to handle the oil each time you reuse it. Moisture and food particles can contribute to oil spoilage.
- Avoid overheating the oil or exceeding its smoke point, as this can accelerate oil degradation.
- If you frequently fry different types of food with strong flavors, consider dedicating specific oils for different purposes. This helps prevent cross-contamination and preserves the integrity of each oil.
Remember that reusing oil should be done judiciously, and it’s essential to exercise proper judgment based on the oil’s condition and the type of food being cooked.
With these steps, techniques, and safety precautions in mind, you’ll be well-equipped to create delicious and perfectly fried dishes in your own kitchen. Enjoy exploring the world of frying and experimenting with different flavors and ingredients!