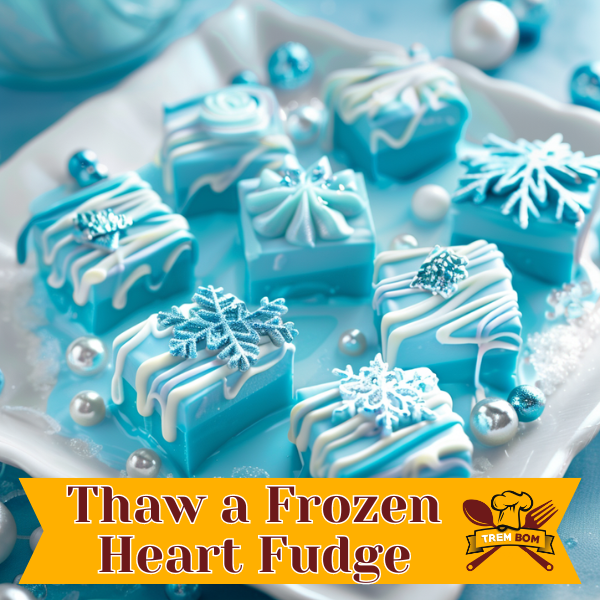
Are you ready to enter the magical world of Disney Frozen Fudge? This tasty treat is perfect for warming up any heart. We’ll show you an easy, homemade recipe with a step-by-step guide. You’ll be making this delightful frozen fudge in no time.
Key Takeaways:
- Discover the enchanting world of Disney Frozen Fudge
- Learn how to make a homemade frozen fudge
- Create a delightful treat that will warm even the coldest hearts
- Follow our step-by-step tutorial for a perfect result
- Enjoy the magic of Disney while satisfying your sweet tooth

Ingredients and Preparation for Making Disney Frozen Fudge Recipe
We’re going to show you how to make Disney Frozen Fudge step by step. It’s really easy, and the result is a sweet delight. It’s a fun and tasty way to capture the Disney magic.
Ingredients
For this fudge, gather up these ingredients:
- White chocolate chips (1 bag, Ghirardelli recommended for best taste)
- Sweetened condensed milk (1 can)
- Blue food coloring
- Blue sprinkles (optional, for decoration)
- Waxed or parchment paper

Instructions
- Melt the Chocolate: Using a double boiler or a microwave, melt the white chocolate chips carefully to avoid scorching.
- Mix Ingredients: Once melted, remove from heat and stir in the sweetened condensed milk. Add blue food coloring until you achieve the desired Frozen-themed blue.
- Prepare for Setting: Pour the mixture into a pan lined with waxed or parchment paper.
- Decorate: If using, sprinkle the blue sprinkles on top for a magical touch.
- Set the Fudge: Refrigerate the fudge until it sets, which should take about 20 minutes.
- Serve: Cut into squares and serve!
Your Disney Frozen Fudge is now ready! This treat combines creamy white chocolate, condensed milk, and a touch of blue. It’s perfect for a Frozen party or any time you want something sweet. Enjoy this simple and impressive fudge recipe.

Serving and Enjoying This Frozen White Chocolate Fudge Recipe
Your Disney Frozen Fudge is all set to enjoy. Let’s learn the best ways to serve and enchant everyone. These tips will make your fudge experience wonderful, whether shared or savored alone.

Slice and Serve
To begin, take the fudge out of the fridge and let it sit. As it warms up, it gets easier to slice neatly. Use a sharp knife to cut it into small pieces. Then, place these pieces on a pretty tray or plate.
Add a Kid-Friendly Twist
To make this treat appeal more to kids, add a drop of vanilla on each one. It lifts the taste and makes it perfect for the little ones.

Creative Presentation
Try presenting your fudge on blue sprinkles, giving a Frozen frost look. You can also use a cute bowl lined with paper and place the fudge inside. Let your creativity shine with a presentation that mirrors the Frozen world.
Share the Joy
Sharing a delicious treat brings everyone closer. Gift your frozen fudge to loved ones. It’s more than dessert; it’s a way to show love and connect. The happiness from enjoying this Frozen-inspired treat with others is indeed priceless.

Storing and Refrigerating
Keep your fudge fresh by storing it right. Use an airtight container or wrap it well. Put it in the fridge for up to a week. This keeps its taste and texture at their best.
With these tips, you’re set to enjoy and share the magic of Disney Frozen Fudge. Savor every bite and create lasting memories with this Frozen-themed delight.

Taking My “Thaw a Frozen Heart Fudge” Recipe To Go
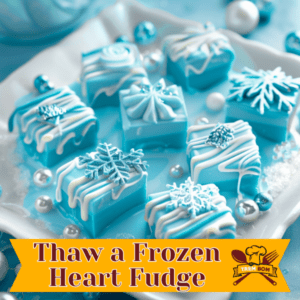
Our journey to create Disney Frozen Fudge has been really fun. We mixed together the taste of white chocolate fudge. And we made it simple in the microwave. This treat will make anyone happy.
Love the Frozen movie or just wanna try a tasty dessert? This Frozen-inspired fudge is perfect. It’s easy to make fromDelish.com. Kids and grown-ups will both love it.
So, why not share this yummy fudge with family and friends? Add blue sprinkles on top for an Arendelle touch. Its creamy taste is ideal for a night watching Frozen with Elsa, Anna, and friends.
Making Disney Frozen Fudge is more than the final treat. It’s about having fun and making memories. Be creative with toppings and share with loved ones. This sweet and easy dessert strengthens our bonds.

Disney Frozen Fudge FAQ
What is Disney Frozen Fudge?
Disney Frozen Fudge is a yummy treat from the movie Frozen. It’s a creamy fudge with white chocolate and tasty extras.
How do I make Disney Frozen Fudge?
Making it is a breeze. Melt white chocolate and milk in a pot. Add blue color. Then chill, slice, and savor!

Can I customize the flavor of Disney Frozen Fudge?
Yes, get creative with flavors. Try adding peanut butter, mint, or caramel to your fudge. Mix it up your way!
How long does Disney Frozen Fudge last?
Stored right, it lasts up to two weeks in the fridge. Yet, its yummy taste might make it vanish quickly!

Can I freeze Disney Frozen Fudge?
Yes, freezing is fine. Wrap in plastic or use a container. Remember, thaw in the fridge first.
Can I make Disney Frozen Fudge without a microwave?
Of course, a microwave isn’t a must. Use a stove to melt the chocolate and milk. Keep stirring till smooth.
Can I add toppings to my Disney Frozen Fudge?
Yes, top your fudge with blue sprinkles or sparkly glitter. It’s the fun part after it sets.
Can kids help make Disney Frozen Fudge?
Absolutely, kids can join in the making. They can stir and decorate. Just watch them around sharp items and heat.

Frozen Fudge Recipe

Thaw a Frozen Heart Fudge
Equipment
- 1 Spatula
Ingredients
- White chocolate chips 1 bag, Ghirardelli recommended for best taste
- Sweetened condensed milk 1 can
- Blue food coloring
- Blue sprinkles optional, for decoration
- Waxed or parchment paper
Instructions
- Melt the Chocolate: Using a double boiler or a microwave, melt the white chocolate chips carefully to avoid scorching.
- Mix Ingredients: Once melted, remove from heat and stir in the sweetened condensed milk. Add blue food coloring until you achieve the desired Frozen-themed blue.
- Prepare for Setting: Pour the mixture into a pan lined with waxed or parchment paper.
- Decorate: If using, sprinkle the blue sprinkles on top for a magical touch.
- Set the Fudge: Refrigerate the fudge until it sets, which should take about 20 minutes.
- Serve: Cut into squares and serve!
Notes
- Use more or less food coloring to get your desired hue
- This recipe is really all about the decorating. Make sure you get all your sprinkles and edible snowflakes ready because that is where the magiv happens with this recipe!
- Add white chocolate chips for “snowball” effect in the fudge. It really pops in the blue!

